


what is nginx and what is it used for
Nginx (pronounced “engine-x”) is an HTTP server and reverse proxy that handles network traffic in an event-driven model, rather than a “thread per connection” approach. As a result, it usually copes better with a large number of concurrent connections, including keep-alive, than the classic process-based model. It is most often used for serving static files (HTML/CSS/JS), TLS termination (HTTPS), acting as a reverse proxy for applications (e.g. Node.js, Python, Java) and for load balancing. In a typical architecture, Nginx runs on port 443 and forwards traffic to backends running locally or on the network (e.g. 127.0.0.1:3000 or 8080).
Nginx in the open source version is free and usually sufficient for most production use cases, while Nginx Plus extends it with, among other things, advanced metrics, active health checks and more efficient upstream management. Configuration is based on contexts (e.g. http, server, location), and you set the domain and port in the server block using listen and server_name. Multiple sites (virtual hosts) are implemented through several server blocks, and on Debian/Ubuntu they are often stored in /etc/nginx/sites-available and enabled with links in sites-enabled. If problems arise, the first place to diagnose is the logs in /var/log/nginx/access.log and /var/log/nginx/error.log, especially when 502/404 errors appear.
Nginx does not run application code (e.g. Python/Node), so to handle the “logic” you need a separate backend such as Gunicorn, uWSGI, Node.js or Tomcat. Its role is an HTTP layer that routes, buffers and secures traffic in front of the application. Compared with Apache, Nginx usually has a lower memory footprint and better performance with a large number of keep-alive connections, while Apache can be simpler in scenarios based on .htaccess and dynamic modules. If the goal is a modern reverse proxy and stable handling of many connections, Nginx is often a practical choice “at the front”.
- 01HTTP server and reverse proxyHandling traffic and applications
- 02Event-driven modelHigh performance, fewer threads
- 03Serving static filesFast loading of HTML/CSS/JS
- 04TLS and load balancingSecurity and traffic scaling
Efficient management of network traffic in modern architectures.
installing nginx on ubuntu and debian
You can install Nginx on Ubuntu/Debian with the command “sudo apt update && sudo apt install nginx”. After installation, it is worth making sure that the service is running using “systemctl status nginx”, and then opening the server IP address in a browser to check whether the default page is displayed. If Nginx is to start after a server reboot, enable autostart with “systemctl enable –now nginx”. This in practice explains the problem of “why Nginx does not come up after a reboot”, because without enable the service does not start automatically.
The main configuration file is usually located at /etc/nginx/nginx.conf, and service configurations are included with the include directive (e.g. conf.d/*.conf), while on Ubuntu the sites-available/sites-enabled structure is commonly used. Before reloading the configuration in production, run “sudo nginx -t” to catch syntax errors and missing files (e.g. certificates). When deploying changes, it is better to use “systemctl reload nginx”, because it reloads the configuration without dropping active connections, whereas “restart” can interrupt traffic. After deployment, you can quickly verify responses with headers using “curl -I http://twoja-domena.pl” and “curl -I https://twoja-domena.pl”, and for 301/302 redirects you will check the rules in server/location and whether TLS is attached correctly.
basic configuration: server, location, root
Nginx configuration is based on server blocks (virtual host) and location blocks (path matching rules), while the directory containing the site files is indicated by the root directive. A minimal virtual host can look like this: “server { listen 80; server_name example.com; root /var/www/example; }”, which immediately resolves the question of “where to set the domain and directory”. The “index index.html;” directive specifies which file should be served by default when entering a directory. With multiple services, the routing mechanism remains the same, because the decision is made by matching in server and location.
location blocks can match a prefix (e.g. “location /api/”) or a regular expression (e.g. “location ~* .png$”), and in the event of a conflict the key thing is the match priority (including exact “=”, then prefixes, while regexes follow their own selection rules). When unexpected 404s appear, it often helps to control behaviour with “try_files”, e.g. “try_files $uri $uri/ =404;”. For SPA applications (React/Vue), the standard is often “try_files $uri /index.html;”, so that refreshing a subpage does not end in a 404. In practice, this is the most common difference between “it works on the homepage” and “it breaks on client-side routing”.
The difference between “root” and “alias” is crucial, because “root” appends the URI to the directory, whereas “alias” substitutes the path directly for the specified location (e.g. “location /static/ { alias /srv/app/static/; }”). A 403 error most often signals a permissions problem with the directory or a missing index file with autoindex disabled, and access can also be further restricted by SELinux/AppArmor. You can set redirects with “return 301 …” (permanent) or “return 302 …” (temporary), and when migrating HTTP→HTTPS it is usually worth making sure it is 301. For consistent UX, you can also define custom error pages, e.g. “error_page 404 /404.html;”, so the user does not see the default Nginx page.
- 01Server block (virtual host)Defines the domain and port.
- 02root directive (directory)Specifies the path to the site files.
- 03Location blocks (routing)Matches URL paths (prefix/regex).
- 04index directive (default file)Specifies the directory’s start file.
- 05Match priorities (order)Exact (=), then prefixes, then regexes.
Key blocks and directives for organising routing and serving files.
reverse proxy for node, python, java applications
You usually configure reverse proxy in Nginx with “proxy_pass” in a location block, forwarding traffic to an application running on the backend port. For Node.js, a typical pattern is “location / { proxy_pass http://127.0.0.1:3000; }”, and when a 502 appears, you first check the port and whether the process is actually listening on the correct address (127.0.0.1 vs 0.0.0.0). For the application to see the correct host and client IP, add “proxy_set_header Host $host;” and “proxy_set_header X-Forwarded-For $proxy_add_x_forwarded_for;”. This often resolves problems with logging in, generating links and identifying the user on the backend side.
Long requests (e.g. data exports) require timeout adjustments, because errors after around 60 seconds are usually caused by limits on the Nginx side or in a middleware layer. In that situation you increase “proxy_read_timeout” and “proxy_connect_timeout”, then verify the endpoint behaviour. With streaming or SSE/WS, buffering is often a source of delays, so you set “proxy_buffering off;”. This means data can reach the client continuously, without artificial “waiting” for larger chunks of the response.
For WebSockets you must explicitly enable upgrade-compatible mode, i.e. “proxy_http_version 1.1; proxy_set_header Upgrade $http_upgrade; proxy_set_header Connection "upgrade";”, otherwise the connection may break or fail to switch to WS mode. If you want to spread traffic across several instances, you define a pool in “upstream app { server 10.0.0.10:3000; server 10.0.0.11:3000; }” and route to “proxy_pass http://app;”. When the application keeps the session in memory, “ip_hash” is useful (or moving the session to Redis), because without it the user may hit different instances and “lose” the session. In open source Nginx, failover is based on errors and timeouts (e.g. “max_fails=3 fail_timeout=30s”), whereas active health checks require Nginx Plus or external tools.
serving static files and frontend optimisation
Nginx works very well for serving static files (HTML/CSS/JS), and this is exactly where it is easiest to “quickly” improve the perceived performance of the frontend. You enable compression with “gzip on;” and “gzip_types text/css application/javascript application/json;”, which is often one of the first actions when you analyse a low PageSpeed score. Brotli can perform better, but it requires an additional module (often as the nginx-module-brotli package), so availability depends on the distribution and build method. If you want to genuinely reduce CSS/JS loading time without touching the application, start with compression and correctly configured cache headers.
You can set cache for versioned files with “expires 30d; add_header Cache-Control "public, immutable";”, which reduces the number of requests on repeat visits. Nginx can also use ETag and modification headers to return 304 Not Modified, provided static resources are served directly by Nginx, not “through the application”. For larger files (e.g. video), “sendfile on; tcp_nopush on; tcp_nodelay on;” is useful, because it reduces data-copy overhead and improves throughput. When the browser downloads a file instead of displaying it (e.g. SVG), verify the MIME types mapping (mime.types file) and whether the correct Content-Type is being set.
You can block access to sensitive files with the rule “location ~ /(.env|.git) { deny all; }”, which protects against typical bot scans looking for secrets. Directory listing enabled by “autoindex on;” makes file publishing easier, but in production it is usually risky — if you see a “file listing”, disable autoindex or add an index file. If an upload ends with a 413 error, raise the “client_max_body_size” limit (e.g. to 50m), remembering that this is a limit on the Nginx side, independent of limits in the application and browser. For SPA applications (React/Vue), a typical snippet is “location / { root /var/www/app; try_files $uri $uri/ /index.html; }”, which removes 404s when entering paths such as /dashboard directly.
- 01File compressionEnable gzip/brotli
- 02Faster loadingImprove frontend performance
- 03Cache configurationSet expires headers
Key steps for a quick frontend performance improvement without changes to the application.
https/tls: certificates and hardening settings
You can get HTTPS up and running in Nginx quickest with Let’s Encrypt and the certbot tool, using “certbot –nginx -d example.com -d www.example.com”. Certbot can automatically add the configuration for 443 and the redirect from 80, but after every modification it is worth running “nginx -t” to catch syntax errors and missing certificate files. If you are configuring TLS manually (for example with another ACME client or corporate certificates), you will use, among other things, “listen 443 ssl http2;” and point to “ssl_certificate …/fullchain.pem;” and “ssl_certificate_key …/privkey.pem;”. Proper HTTPS enforcement is handled by a separate server on port 80, which returns “return 301 https://$host$request_uri;”.
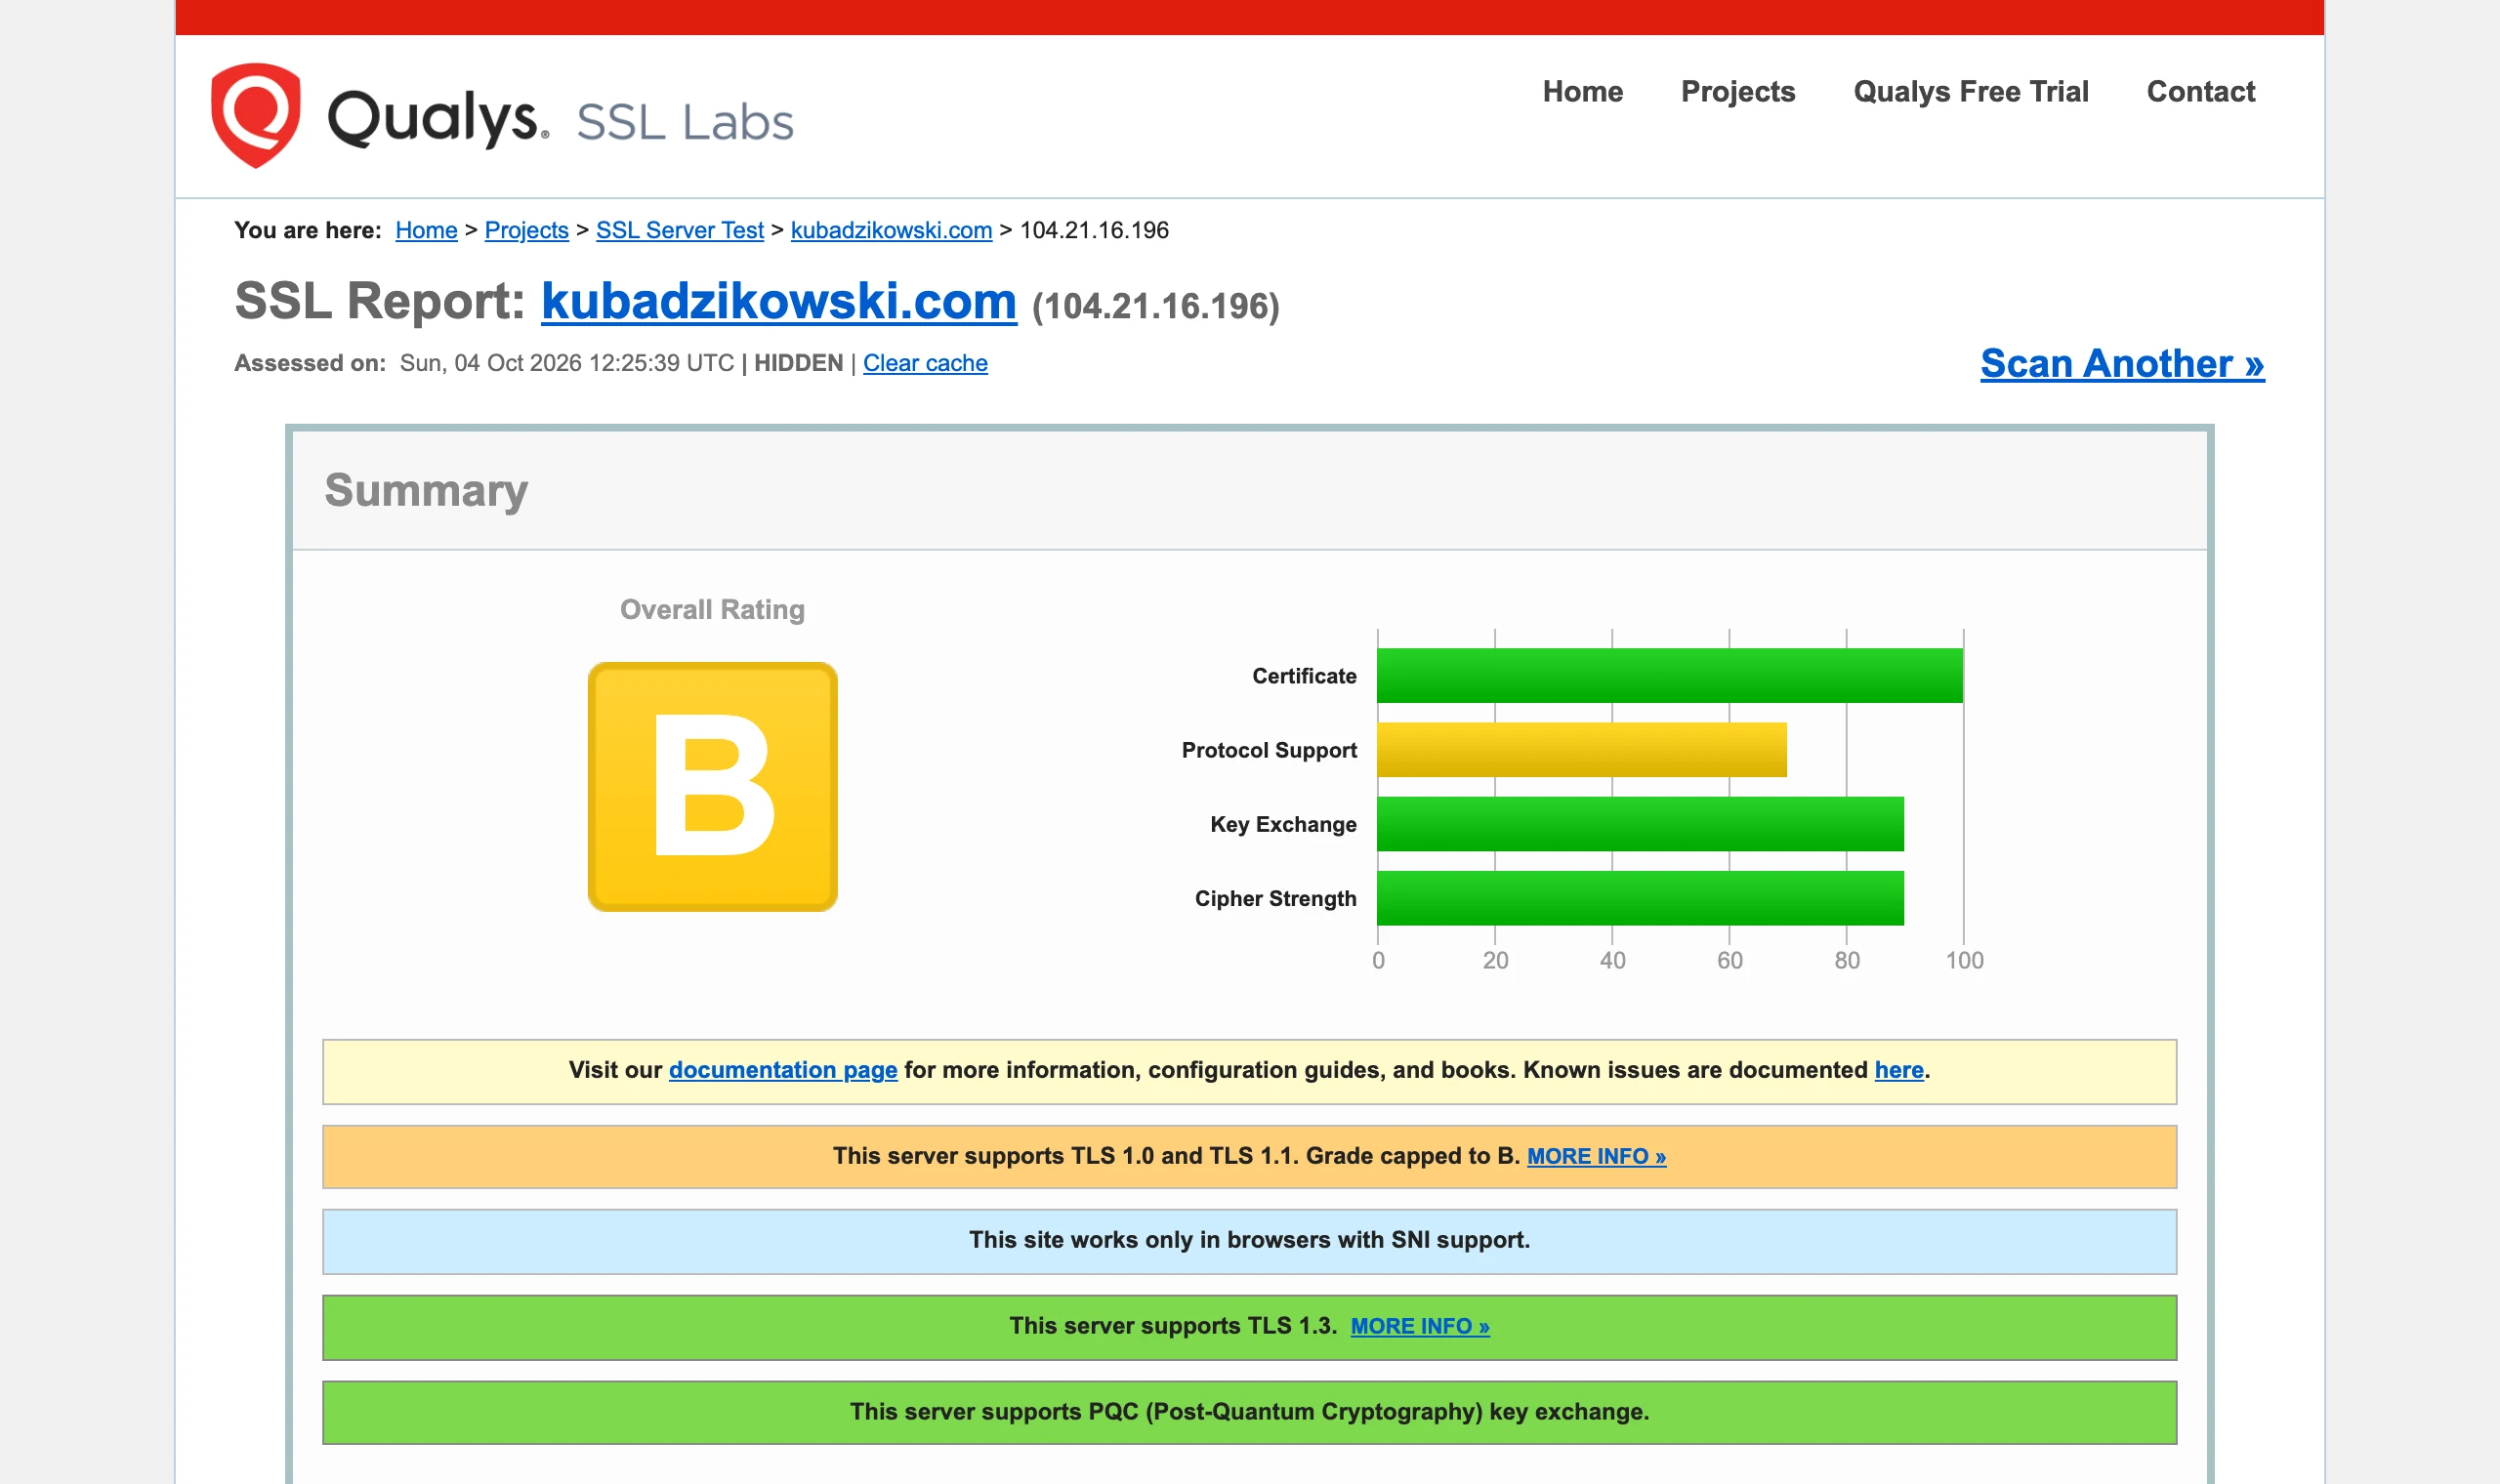
Harder TLS settings usually start with narrowing the protocols to “ssl_protocols TLSv1.2 TLSv1.3;”. Before disabling older versions, it is a good idea to make sure you are not cutting off legacy clients. You enable HSTS with the header “add_header Strict-Transport-Security "max-age=31536000; includeSubDomains" always;”, but do so carefully, because once activated, browsers will enforce HTTPS, and a faulty certificate may block access for users. You can enable OCSP stapling with “ssl_stapling on; ssl_stapling_verify on;” together with a correctly configured DNS resolver, which speeds up certificate validation. To check the certificate chain, “openssl s_client -connect example.com:443 -servername example.com” is useful, and an external Qualys SSL Labs test makes it easier to assess the configuration (for example weak ciphers, missing HSTS).
In practice, maintaining HTTPS also means keeping an eye on renewals, because Let’s Encrypt requires them every 90 days, and certbot usually installs a systemd timer or cron job. To avoid downtime caused by an expired certificate, check the schedule with “systemctl list-timers | grep certbot” and run “certbot renew –dry-run” from time to time. You can enable HTTP/2 with “listen 443 ssl http2;”, which usually helps on sites with many assets, whereas HTTP/3 (QUIC) depends on the version and build method of Nginx. Below is a short list of commands that are most often useful when deploying and checking TLS:
- “nginx -t” – check the configuration before reload and after certificate changes.
- “openssl s_client -connect example.com:443 -servername example.com” – quick check of the certificate chain.
- “systemctl list-timers | grep certbot” – confirm that renewals are scheduled.
- “certbot renew –dry-run” – test renewal without the risk of an “unexpected surprise” on the expiry date.
Performance: workers, cache, rate limiting
You can most easily improve Nginx performance by sensible worker, connection limit and cache settings so that the server can reliably handle heavy concurrent traffic. For most machines, a good starting point is “worker_processes auto;” and increasing “worker_connections” (for example to 4096 or 8192), because this directly translates into the number of simultaneous connections. An approximate formula for maximum concurrency is worker_processes * worker_connections (taking overhead into account), which lets you quickly assess whether the whole setup has a chance of holding together under a given load. If Nginx is “choking” under many connections, start with worker_processes and worker_connections before moving on to tuning the application.
Latency in APIs can often be reduced by keeping connections alive, because with many short requests the cost of establishing TCP drops. The configuration “keepalive_timeout 65;” and keepalive on the upstream side can noticeably reduce load on the backend and shorten response times without touching the code. When traffic is uneven, especially at peak times, caching backend responses with “proxy_cache_path” and “proxy_cache” helps reduce the number of hits to the application. However, if logged-in users see outdated data, a rule for bypassing the cache is usually missing, for example “proxy_cache_bypass $http_authorization;”.
You can limit abuse and a “flood” of requests with rate limiting and limits on concurrent connections per IP. To limit requests, use “limit_req_zone $binary_remote_addr zone=api:10m rate=10r/s;” and “limit_req zone=api burst=20 nodelay;”, and for concurrency use “limit_conn_zone $binary_remote_addr zone=addr:10m;” and “limit_conn addr 20;”. Excessive logging can push up iowait, so when disk becomes a bottleneck, it is worth considering buffering or selective logging, for example without health checks, and making sure rotation is in place. For measurements, instead of working blind, use benchmarks like “wrk -t4 -c200 -d30s https://example.com/” or “ab -n 10000 -c 200”, and with a large number of static files also check “open_file_cache max=10000 inactive=30s;”.
- “worker_processes auto;” + higher “worker_connections” (e.g. 4096/8192) – the foundation with a large number of connections.
- “keepalive_timeout 65;” and keepalive upstream – lower TCP costs with many short requests.
- “proxy_cache_path”/“proxy_cache” + “proxy_cache_bypass $http_authorization;” – cache with control for authorised content.
- “limit_req…” and “limit_conn…” – protection against abuse and resource “eating” by a single IP.
- “wrk”/“ab” and “open_file_cache…” – measurement and quick gains with static assets.
security: hardening and practical principles
Hardening Nginx comes down to limiting what the server reveals and accepts, and adding protective layers that reduce the attack surface. The simplest step is “server_tokens off;” so as not to reveal the version in headers and error pages, which does not replace security controls, but makes fingerprinting harder. It is also good practice to add security headers such as “X-Content-Type-Options: nosniff”, “X-Frame-Options: DENY/SAMEORIGIN” and a sensible “Content-Security-Policy”, because this directly reduces the risk of XSS and clickjacking at the reverse proxy layer. If you are to make one change “right now”, turn off server_tokens and set the basic security headers.
You can most easily slow down brute force attacks and automated scans by combining Nginx with fail2ban, which analyses /var/log/nginx/access.log and blocks IPs after too many 401/403/404 responses. This works particularly well when you are seeing mass attempts against endpoints such as /wp-login.php or /admin, and at the same time do not want to rebuild the application. It is also worth narrowing the allowed HTTP methods if they are not needed from the internet, e.g. with the rule “if ($request_method .~ ^(GET|POST|HEAD)$) { return 405; }”, which is often required during audits. In the case of admin panels, the simplest option is to block access by IP (“allow 1.2.3.4; deny all;”) or expose them only through a VPN.
In situations where you need a WAF, you can use ModSecurity v3 (libmodsecurity) with Nginx, although implementation can be more labour-intensive, or choose a cloud WAF (e.g. Cloudflare) in front of Nginx. On the reverse proxy side, it is also important not to pass headers such as X-Forwarded-Proto/Host from the internet through to the application without scrutiny, because if the backend trusts them, an attacker can influence links, redirects or security logic. Good practice is to run Nginx with an unprivileged user (www-data/nginx) and maintain minimal file permissions, which limits the impact of a potential incident. With SELinux (Enforcing), remember to set the correct contexts for directories, otherwise you may see a 403 despite correct chmod.
FAQ
Frequently asked questions
How does Nginx work as a reverse proxy in front of a backend application?
Nginx receives HTTP/HTTPS traffic and forwards it to an application running on a separate port, e.g. 3000 or 8080. It does not run the application code itself, only handles the HTTP layer and request routing.
Does Nginx handle a large number of connections better than a server in a thread-per-connection model?
Yes, because it works in an event-driven model rather than “thread per connection”. As a result, it usually handles many simultaneous connections better, including keep-alive.
How do you install Nginx on Ubuntu or Debian?
Just run `sudo apt update && sudo apt install nginx`. Then it is worth checking the service status with `systemctl status nginx` and enabling autostart with `systemctl enable –now nginx`.
What do the server and location blocks mean in Nginx configuration?
The `server` block is responsible for the virtual host, i.e. the domain and port, and `location` for matching URL paths. These are where you set, among other things, `listen`, `server_name`, `root` and rules for handling specific addresses.
How do you set up a redirect from HTTP to HTTPS in Nginx?
This is most often done with a separate `server` block on port 80 with the `return 301 https://$host$request_uri;` directive. Before that, you need TLS correctly configured on port 443.
Why do a 502 or 404 error appear after deploying Nginx?
A 502 error usually indicates a problem with the backend, e.g. the wrong port or no listening process. A 404 most often results from an incorrect `root`, `try_files` or errors in matching `server` and `location`.